In a house or flat, there may be various factors affecting your Wi-Fi signal strength, coverage, and connectivity speeds. This can be how far you are from the router, how thick your walls or floors are, how many reflective surfaces and what type of Wi-Fi standard you have.

If you think your internet connection has slowed down lately, you may want to check your Wi-Fi signal strength to find out the connection performance.There are a number of ways of checking this and each of them tell you a number of factors to let you know how good your signal is. If you need any further information on any of the results please contact the support team and they can help.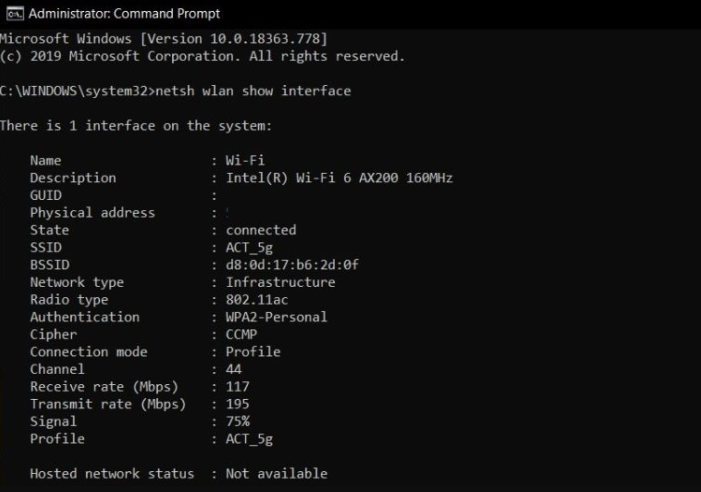
Check your Wi-Fi signal
1.Open Start menu by clicking on the Windows button
2.Type CMD and the Command Prompt icon will appear at the top of the start menu
3.Right click the Command Prompt icon and select Run as Administrator
4.When the Command Prompt screen will come in to view, when it does type the following: -
netsh wlan show interfaces
5.The following information will be displayed:
6.The important information from the dataset is: -
Receive rate (Mbps) : 117 Transmit rate (Mbps) : 195 Signal : 75%The receive and transmit rate are the maximum speed the WiFi can operate at from your test location. In this example, the average broadband speed is around 40 Mbps, so a Wi-Fi speed of 117 Mbps is more than adequate to ensure that the device is using all available internet bandwidth.The signal keeps an overall quality assessment of the link. Anything below 50% could experience packet loss, which would have a negative impact on real time protocols such as video and voice.
Mapping your home
You can take your laptop around your home and keep repeating the command to find the best and weak Wi-Fi signal to help you get better coverage. If you're handy with Microsoft PowerShell you could automate this in to a CSV/Excel file and tag in GPS coordinate data!To discuss your specific server needs, please get in touch. We’re always happy to help. Please reach out via our contact page.